
Advanced applications and custom libraries often require to create custom form controls that one can use in with ngModel and form controls. We are going to describe the journey from a simple component to a re-usable custom form control.
Motivation
Imagine a nicely designed tags component. UX is great, it looks good. Here is how it looks like:
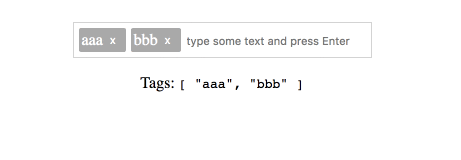
And here is how developers use it:
<app-tags [tags]="tags" (tagsChange)="tags = $event"></app-tags>However, the standard way in Angular to handle user inputs is through forms, being template driven or reactive. As it is, we can not use our tags component in a regular Angular form or with a standalone ngModel binding. We can workaround that but the most straight-forward way to make our component easier to use is to make it a real Custom Value Accessor. At the end of our journey, we will be able to use our component as follows:
<app-tags [(ngModel)]="tags" [disabled]="…"></app-tags>

<app-tags [ngModel]="tags" (ngModelChange)="myCallback($event)"></app-tags>

<app-tags [formControl]="tagsControl"></app-tags>

<app-tags formControlName="tags"></app-tags>
The simple tags implementation
Let’s start by having a look at our tags component: the user can enter several text values that are then stored in an array of strings and returned as output by the component.
<ul>
  <ng-template ngFor [ngForOf]="tags" let-tag let-index="index">
    <li>
      {{tag}}
      <button type="button" (click)="remove(index)">x</button>
    </li>
 </ng-template>
</ul>

<input type="text"
 [(ngModel)]="newTag"
 (keydown)="onInputKeyDown($event)"
 placeholder="type some text and press Enter" />
export class TagsComponent implements OnChanges {
@Input() tags: string[];
@Output() tagsChange = new EventEmitter<string[]>();
newTag = '';
constructor() { }
ngOnChanges() {
this.tags = this.tags || [];
}
remove(index: number) {
this.tags.splice(index, 1);
this.copyAndEmit();
}
onInputKeyDown($event: KeyboardEvent) {
if ($event.key === 'Enter') {
this.tags.push(this.newTag);
this.copyAndEmit();
this.newTag = '';
} else if ($event.key === 'Backspace' && this.newTag === '') {
this.tags.pop();
this.copyAndEmit();
}
}
private copyAndEmit() {
this.tags = this.tags.slice(0);
this.tagsChange.emit(this.tags);
}
}At the moment, you can use it like that:
<app-tags [tags]="tags" (tagsChange)="tags = $event"></app-tags>Make our tags component a control value accessor
In order to make this component a control value accessor, the first thing to do is to declare our component as being usable along with the Angular forms API. To do that, we add a provider to the Component decorator:
import { Component, forwardRef } from '@angular/core';
import { ControlValueAccessor, NG_VALUE_ACCESSOR } from '@angular/forms';

@Component({
  …
  providers: [{
    provide: NG_VALUE_ACCESSOR,
    useExisting: forwardRef(() => TagsComponent),
    multi: true
  }]
}) export class TagsComponent {

  …
}
A control value accessor is a bridge between the Angular forms API and a component: it interacts with the rest of your Angular application through the ngModel or the formControl or the formControlName directives. When those directives are bound to an element, Angular expects this element to implement a specific interface: ControlValueAccessor. As its name indicates, your component controls the access to the value:
- Angular gives the value to your component so that your component can do internal logic: changing variables, manipulating the DOM etc. The value is given through the writeValue method that your component implements.
- Angular gives two callbacks to your component: onTouched and onChange. Your component should store those two callbacks and call them whenever the value has been changed (onChange) and when the control has been touched (onTouched). Those two callbacks are given through the registerOnChange and registerOnTouched methods.
- Your component is free to implement the
setDisabledmethod. Angular will use this method to enable or disable your component.
The next step is to implement the necessary methods: they are declared in the ControlValueAccessor interface.
export class TagsComponent implements ControlValueAccessor {
  onChange: (value: string[]) => void = () => {};
  onTouched: Function = () => {};
  isDisabled = false;

  …

  writeValue(value: string[]) {
    this.tags = value || [];
  }

  registerOnChange(fn: any) {
    this.onChange = fn;
  }

  registerOnTouched(fn: any) {
    this.onTouched = fn;
  }

  setDisabledState(disabled: boolean) {
    this.isDisabled = disabled;
  }
}
This is how the tags component looks like now:
import { Component, forwardRef, HostBinding } from '@angular/core';
import { ControlValueAccessor, NG_VALUE_ACCESSOR } from '@angular/forms';

@Component({
  selector: 'app-tags',
  templateUrl: './tags.component.html',
  styleUrls: ['./tags.component.sass'],
  providers: [{
    provide: NG_VALUE_ACCESSOR,
    useExisting: forwardRef(() => TagsComponent),
    multi: true
  }]
})
export class TagsComponent implements ControlValueAccessor {

  // tags is no longer an input of our component, we have writeValue to handle that logic now
  tags: string[] = [];
  newTag = '';

  // we give some disabled style
  @HostBinding('class.disabled')
  isDisabled = false;

  // we store the two callbacks that Angular gives us
  // we also provide defaults so that our component can be used standalone
  onChange: (value: string[]) => void = () => {};
  onTouched: Function = () => {};

  constructor() { }

  // didn't change!
  remove(index: number) {
    this.tags.splice(index, 1);
    this.copyAndEmit();
  }

  // didn't change!
  onInputKeyDown($event: KeyboardEvent) {
    if ($event.key === 'Enter') {
      this.tags.push(this.newTag);
      this.newTag = '';
      this.copyAndEmit();
    } else if ($event.key === 'Backspace' && this.newTag === '') {
      this.tags.pop();
      this.copyAndEmit();
    }
  }

  // writeValue is called by Angular when the input value changes
  writeValue(value: string[]) {
    this.tags = value || [];
  }

  // registerOnChange is called by Angular
  // this is the opportunity for us to save the onChange callback
  // we use this callback to "output" new values
  registerOnChange(fn: any) {
    this.onChange = fn;
  }

  // registerOnTouched is called by Angular
  // this is the opportunity for us to save the onTouched callback
  // we use this callback to notify Angular when our component has been touched
  registerOnTouched(fn: any) {
    this.onTouched = fn;
  }

  // setDisabledState is called by Angular
  // this is the opportunity for us to adjust our component style and logic
  setDisabledState(disabled: boolean) {
    this.isDisabled = disabled;
  }

  // we remove the @Output that we had and we, instead, emit through the onChange callback
  // we also tell Angular that the component has been touched
  private copyAndEmit() {
    this.tags = this.tags.slice(0);
    this.onChange(this.tags);
    this.onTouched();
  }
}
Our component is now a control value accessor and can now be used as a standard form control or with `ngModel`.
KM
Photo by Esther Jiao on Unsplash